TrueNAS Scale Joplin
Overview
Setup Joplin on TrueNAS Scale.
Assumptions
TrueNAS Scale Setup completed.
TrueNAS Scale NPM completed.
Logged in as administrative user.
Storage Configuration
Create a new dataset for Joplin to use for Postgres storage. This dataset needs to be read and writable by the netdata user. The default ixVolume could be used for Joplin storage, but this is unideal for most TrueNAS setups (especially for users using a dedicated applications SSD).
Create Dataset
Navigate to the Datasets tab in the TrueNAS dashboard.
Select the dataset or pool that the new joplin dataset should be stored in.
Select Add Dataset within Dataset Details. Configure the new dataset using the wizard.
| Setting | Value | Description |
|---|---|---|
| Parent path | pool01 | Will be the name of the parent dataset. |
| Name | joplin | Name of the dataset to create. |
| Comments | | Optional comments for your memory. |
| Sync | Inherit (standard) | Determines when to wait for data writes to complete. |
| Compression level | Inherit (lz4) | Set compression level, LZ4 recommended. |
| Enable Atime | Inherit (off) | Update file access time when read. |
| Encryption Options | Inherit | Inherit unless the dataset being created needs to have a different key. |
| ZFS Deduplication | Inherit (off) | Deduplicate data when stored. Do not use if on a resource-light system. |
| Case Sensitivity | Sensitive | Choose filename case sensitivity. |
| Share Type | Generic | Change to SMB if required for your application. |
Select Save to create the new dataset.
Dataset Permissions
For the Joplin app to utilize the created dataset, the permissions for the dataset need to be modified.
Select the created joplin dataset and find the Permissions details section.
Edit the permissions to achieve the following. This will grant Postgres access to the dataset.
| Setting | Value | Description |
|---|---|---|
| Owner | — | — |
| User | netdata | May be replaced by 999, the netdata UID, this is acceptable. |
| Apply User | true | Apply user changes. |
| Group | docker | May be replaced by 999, the docker GID, this is acceptable. |
| Apply Group | true | Apply group changes. |
| Access | — | — |
| User | Read - Write - Execute | Allow apps user to read, write, and execute (7). |
| Group | None | Only user should be granted permissions (0). |
| Other | None | Don’t allow any other users to access the dataset. (0). |
| Advanced | — | — |
| Apply permissions recursively | true | Apply permissions to all dataset files. |
| Apply permissions to child datasets | true | Apply permissions to all child-dataset files. |
Select Save to apply the configured permissions.
Install Joplin
Navigate to the Applications page in the TrueNAS Scale dashboard, Apps on the main navigation.
Switch to the Available Applications tab in the Applications page.
Using the search tool, find the joplin application. Verify Joplin is from the TrueNAS catalog and is on the Community train.
Select Install to begin configuration and installation of the application. Configuration options not mentioned in this section can be left as default.
Application Name
| Setting | Value | Description |
|---|---|---|
| Application Name | joplin | Name for the application. |
| Version Number | #.#.# | Version to use, latest by default. |
Joplin Configuration
| Setting | Value | Description |
|---|---|---|
| Postgres Image | Postgres 17 | On new installations, use Postgres 17. If importing an existing Postgres 15 database, use Postgres 15 until ready to upgrade. Database upgrades are one-way. |
| Database Password | Generated-Secure-Password | Generate a secure database password. |
| Base URL | https://joplin.truenas.example.com | URL that will be used by clients to access Joplin. If there will not be a proxy infront of Joplin, or if the proxy uses non-standard ports, include the port number. |
Network Configuration
| Setting | Value | Description |
|---|---|---|
| WebUI Port | 30027 | Port Joplin service will be exposed on. Include this port in the Base URL if not using a proxy. |
Storage Configuration
The following configuration assumes the previously created Joplin dataset is used. To continue with an ixVolume, just leave the values as default.
| Setting | Value | Description |
|---|---|---|
| Joplin Postgres Data Storage | — | — |
| Type | Host Path | Use ixVolume for data storage. |
| Enable ACL | false | Enable to configure Access Control List. |
| Host Path | /mnt/pool01/joplin | Select the created joplin dataset from the storage pool. |
| Automatic Permissions | false | Permissions were previously assigned for the netdata user. Enable this if permission issues persist. |
Resources Configuration
| Setting | Value | Description |
|---|---|---|
| CPU Limit | 1 | Configure a CPU thread limit for the application. 1 should be adequate for small deployments. |
| Memory Limit | 2048 | Memery limit in megabytes. 2 gigabytes should be adequate for small deployments. |
Install
Verify you have checked the TrueNAS documentation for Joplin and Install. The application will complete installation and deploy. Navigate to the Applications tab to monitor the status.
NPM Proxy Host
Add a Nginx Proxy Manager proxy host for the Joplin service.
From the Nginx Proxy Manager dashboard, select Proxy Hosts under Hosts.
Select Add Proxy Host from the Proxy Hosts dashboard.
Proxy Host Details
Configure the new proxy host details.
| Setting | Value | Description |
|---|---|---|
| Domain Names | joplin.system.example.com | Hostname used to access Joplin, must have a matching DNS record. |
| Forward Hostname / IP | 172.16.13.13 | Use the IP addess of the host server. The loopback address will not work. |
| Forward Port | 30027 | Use the mapped service port, not the internal Docker port. |
| Cache Assets | false | |
| Block Common Exploits | true | |
| Websockets Support | false | |
| Access List | local | Optionally, use the configured access list to limit devices that can connect. |
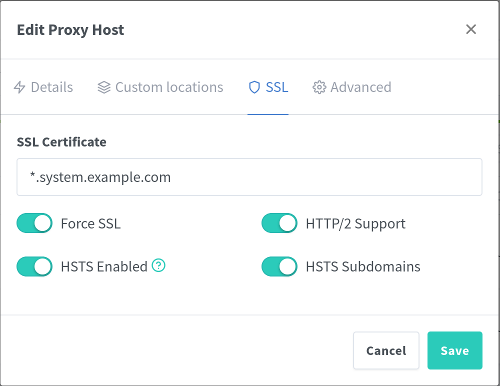
Proxy Host SSL
Switch to the SSL tab for the new proxy host and configure it to use the generated certificate.
| Setting | Value | Description |
|---|---|---|
| SSL Certificate | *.system.example.com | Use the generated certificate. |
| Force SSL | true | |
| HTTP/2 Support | true | |
| HSTS Enabled | true | |
| HSTS Subdomains | true |
Proxy Host Connect
Save the new proxy host and view the added host in the proxy hosts list.
If a local DNS server is setup, verify there is a wildcard entry for the local server or create one specifially for Joplin.
If there is no local DNS server yet, add a custom host entry to /etc/hosts.
sudo nano /etc/hostsAdd the required domain(s) and point them to the host server IP address.
172.16.13.13 system.example.com
172.16.13.13 npm.system.example.com
172.16.13.13 joplin.system.example.com
Navigate to the Joplin service with the configured domain, no port required if Nginx Proxy Manager was assigned port 80/443.
https://joplin.system.example.com/Connect
Connect to the Joplin service in a browser at the configured domain, https://joplin.truenas.example.com/. A login page will be presented.
The default Joplin login credentials are:
- Email:
admin@localhost - Password:
admin
After logging in, follow the prompts to change the login credentials.

Errors
Postgres Upgrade Failure
Initial installation or upgrades may fail if the Postgres dataset has incorrect permissions. Configure the permissions manually
, or enable Automatic Permissions, for the Joplin dataset.
Container ix-joplin-postgres_upgrade-1  service "postgres_upgrade" didn't complete successfully: exit 1
service "postgres_upgrade" didn't complete successfully: exit 1
References
iXsystems. “TrueNAS Documentation .” 2025. ↩︎
iXsystems. “TrueNAS Joplin Documentation .” 2025. ↩︎
Laurent Cozic. “Joplin Documentation .” 2025. ↩︎
Laurent Cozic. “Joplin GitHub .” 2025. ↩︎
iXsystems. “TrueNAS Nginx Proxy Manager Documentation .” 2025. ↩︎
Nginx Proxy Manager. Nginx Proxy Manager Documentation . 2024. ↩︎
Nginx Proxy Manager. “Nginx Proxy Manager GitHub .” 2024. ↩︎
TrueNAS Community Forums. “SOLVED: Home-Assistant - new App install - Scale 24.10 - service “postgres_upgrade” fails .” 2024. ↩︎